Web Design Agency
Your Success Story Starts Here
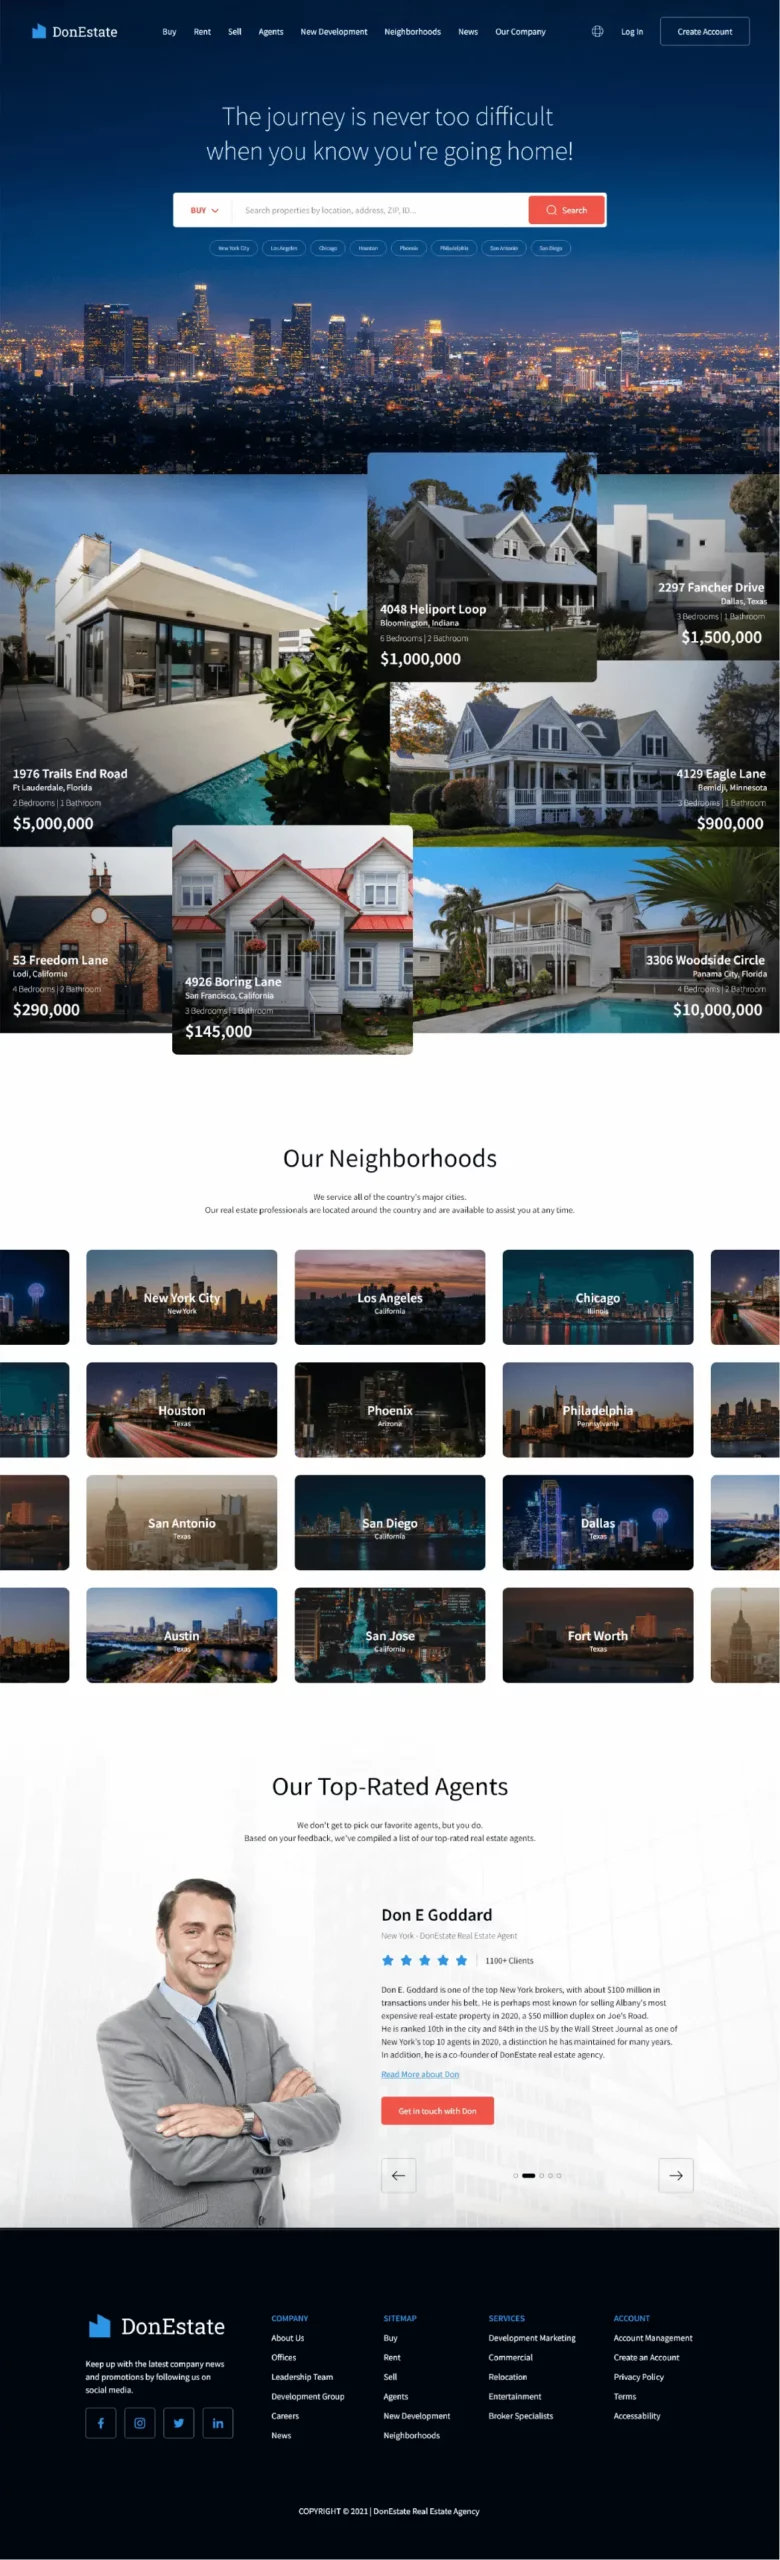
Featured Case Study | Good Life Property Management
Improving the
Good Life Experience
Good Life Property Management needed a web design partner to redesign and rebuild their website. The SEO results were substantial.
Strategy: UI/UX Design, Web Development, SEO
45k
148
New Keywords in Top 3 Organic Search Position
55k
New Website Visitors
438%
Website Traffic Increase
Website Design.
Website Development.
As a full-service San Diego web design agency, we work closely with our clients to design and develop transformative user experiences across all devices. Whether you need branding, design systems or entire web systems, we can help you. We love connecting with interesting brands and telling their stories through creative technology. Our general process for most projects is as follows:
01.
Website Design
We design and redesign websites that communicate to audiences.
02.
Website Development
We use modern tech stacks to build modern websites.
03.
Website Ranking
We implement SEO best practices to help your website rank.
Everything your site needs for success
- Brand Development & Creative Services
- Custom Web Design
- WordPress Development & Maintenance
- Website Analytics & Conversion Tracking
- Search Engine Optimization (SEO)
- Website Accessibility
Challenge Accepted.
We solve your website performance bottlenecks
My website isn’t getting enough traffic and leads
- Boost your presence in search engines
- Get discovered organically
- Turn website visitors into leads
My website is out-of-date and needs a revamp
- Clarify your company message
- Generate more leads from your website
- Make every landing page count
My website is too complicated to manage
- Get tailored low-code to no-code solutions
- Receive training on your website architecture
- Easily manage your website in-house
My logo and brand is out-dated and unimpressive
- Modernize your brand
- Unify your professional identity across the internet
- Standardize future asset development
Our Strategic Approach.
01/
Discovering Your Opportunity
Before we embark on any project, we immerse ourselves in your industry. Through extensive market research, we dive deep into your value proposition, your customers’ expectations, your messaging strategy, and your prevailing challenges. After we have a comprehensive understanding of your organization’s standing, we shift our focus to your competitors. Lastly, we cap off our preparatory phase by conducting an in-depth and comprehensive audit of your website that will serve as a cornerstone for the rest of the redesign journey.
- Market Research
- Competitor Analysis
- Website Audit
02/
Developing Your Brand
Redesigning a website around an antiquated brand doesn’t always yield a meaningful return on investment. If you’re considering brand development before your website redesign, then our approach involves a comprehensive evaluation of your logo, color palette, and design methodologies. By adhering to the tenets of color psychology, ADA compliance, and contemporary design principles, we will establish a foundation for your brand and creative directives that will set you up for long-term success.
- Brand Positioning
- Website Style Guide
- Streamlined Creative Assets
03/
Experience Design
We believe that every click, scroll, and interaction should be a seamless journey that captivates and engages your audience. From intuitive navigation to visually stunning interfaces, we prioritize every detail to create an immersive digital environment that leaves a lasting impression. Experience the power of intentional user design and unlock a world of unparalleled user satisfaction, increased conversions, and improved website performance. Your website is more than a platform – it’s a gateway to meaningful connections, and we’re here to make every interaction count.
- User Interaction and Experience Design
- Digital Storytelling
- Responsiveness (Mobile-Friendly) Design
04/
Cracking the Code
Whether we’re designing fresh interfaces, rearranging content structures, or integrating third-party systems, our primary focus is ensuring that the website experience generates the utmost value to the user. We don’t just focus on what we’re building; we pay equal attention to how we’re building it. Our intention is to not just deliver short-term solutions, but to lay down foundations that will support you well into the future. Just like an architect plans a building for long-term stability, we meticulously strategize and implement your digital ecosystem to ensure its longevity.
- WordPress CMS Customizations
- Plugin Development and Support
- HTTPS (SSL) Security
05/
Testing and Quality Assurance
Once the design and development phase is complete, we take a dedicated step further by conducting thorough usability and accessibility testing. Through our usability testing approach, we validate intuitive navigation, seamless interactions, and overall user satisfaction. Simultaneously, our commitment to accessibility is upheld by rigorously assessing the site’s compatibility with various assistive technologies, screen readers, and adherence to global accessibility standards.
- Usability Testing for Seniors and People with Disabilities
- Automated and Manual Accessibility Testing
- Browser and Device Compatibility
06/
Search Engine Optimization
Integrating SEO into every facet of the website redesign process is a cornerstone of our approach. From the initial website audit to the final stages of development, SEO is ingrained into our methodology. We understand that a visually appealing website is only as effective as its visibility to the right audience. By baking SEO into each stage of the redesign, we ensure that the websites we craft are not only aesthetically appealing but also search-engine friendly, driving organic traffic and enhancing our clients’ online presence.
- Google Analytics and Google Search Console Integration
- Technical SEO
- On-Page SEO
Don't take our word for it...
Awards & Accolades


Frequently Asked Questions
What does a web design agency do?
A web design agency is a team of professionals that specializes in creating and developing websites for businesses and organizations. Here’s an overview of the key services provided by a web design agency:
- Website Design and Layout: Web design agencies create visually appealing layouts, color schemes, typography, and overall aesthetics that align with the client’s brand identity.
- User Experience (UX) Design: Web design agencies ensure the websites they build are easy to navigate, with clear calls to action, logical information hierarchy, and a user-friendly interface.
- Responsive Design: Web design agencies ensure that the websites they build will function well on various browsers, devices and screen sizes, and that the web design adapts accordingly.
- Front-End Development: They transform design website mockups into functional web pages by writing code in HTML, CSS, and JavaScript or using a high-performing page builder.
- Back-End Development (Optional): Some agencies offer server-side development for dynamic features like user authentication, content management systems, and e-commerce functionality.
- Search Engine Optimization (SEO): Web design agencies who specialize in SEO will offer basic SEO services to optimize the website’s content and structure for better search engine visibility.
- Testing and Quality Assurance: Web design agencies rigorously test websites across browsers, devices, and screen sizes to identify and fix bugs and compatibility issues.
- Maintenance and Updates: Ongoing maintenance services ensure the website remains secure, up-to-date, and functioning properly.
- Collaboration and Communication: Reputable web design agencies work closely with clients, gathering requirements, providing updates, and incorporating feedback to achieve the desired outcome.
- Graphic Design and Branding: Some agencies offer graphic design services for logos, visual elements, and branding materials that align with the website’s design.
- Consultation and Strategy: Some web design agencies provide consultation and strategic planning to help clients define their online presence, target audience, and overall web strategy.
In summary, a web design agency combines creative design skills with technical expertise to create visually appealing, user-friendly, and functional websites that effectively serve their clients’ goals and needs.
How much does it cost to pay an agency to design a website?
The cost of hiring a professional web design agency to design a website can vary significantly based on several factors, including the complexity of the project, the level of customization, the features and functionality required, the experience of the agency, and the geographical location of the company. Here’s a general breakdown of the cost ranges you might encounter:
- Basic Static Website: A simple, static website with a few pages and minimal customization might cost anywhere from $2,500 to $5,000 or more. This is suitable for small businesses or personal websites.
- Small Business Website: A more comprehensive website for a small business with additional features like contact forms, galleries, and basic content management could range from $5,000 to $15,000.
- E-Commerce Website: If you’re looking to set up an online store with e-commerce functionality, the cost can start around $7,500 and go up depending on the number of products, payment gateways, and additional features needed.
- Customized and Dynamic Websites: Websites that require custom design, advanced functionality, content management systems (CMS), and integrations can start around $25,000 and easily go beyond $40,000 or more.
- Large and Complex Projects: Websites for larger businesses, enterprises, or projects with intricate features, user interfaces, and backend development could range from $50,000 to several hundreds of thousands of dollars.
- High-End Design Agencies: Hiring top-tier design agencies known for their exceptional design, user experience, and branding expertise can lead to higher costs, often starting at $25,000 and reaching much higher for complex projects.
It’s important to note that these are rough estimates and the actual cost can vary widely. Additionally, ongoing costs for domain registration, hosting, maintenance, updates, and potential future enhancements should be considered.
When considering hiring a web designer or agency, it’s a good practice to gather multiple quotes, review portfolios, and discuss your project’s specific requirements and goals to get a more accurate estimate. Keep in mind that investing in a well-designed and functional website can offer long-term benefits by attracting customers, enhancing your online presence, and improving user engagement.
What is the difference between a web design company and a web design agency?
The terms “web design company” and “web design agency” are often used interchangeably.
Why should I hire a web design agency?
Hiring a web design agency can offer numerous benefits, especially if you have specific goals, a complex project, or a desire to create a strong online presence. Here are some compelling reasons to consider hiring a web design agency:
- Expertise and Specialization: Web design agencies consist of diverse teams with specialized skills, including designers, developers, marketers, and strategists. This expertise ensures that every aspect of your website, from design to functionality, is handled by professionals who understand the latest trends and best practices.
- Comprehensive Services: Web design agencies often offer a range of services beyond just design, such as branding, content strategy, SEO, user experience optimization, and even digital marketing. This holistic approach can lead to a more cohesive and effective online presence.
- Customized Solutions: Agencies can tailor their services to your specific needs, ensuring that your website aligns with your brand, goals, and target audience. They can create custom designs and functionalities that cater to your unique requirements.
- Quality and Innovation: Web design agencies are focused on delivering high-quality work and staying up-to-date with the latest design and technology trends. They can incorporate innovative features and design elements that set your website apart.
- Time Efficiency: With a dedicated team working on your project, a web design agency can complete your website faster than an individual freelancer or a DIY approach. This is especially important for businesses that want to launch their websites quickly.
- Scalability: If your project grows or requires additional features in the future, a web design agency can handle the scaling process more effectively, ensuring that your website remains responsive and functional as your needs evolve.
- Professionalism and Credibility: A well-designed website enhances your brand’s credibility and professionalism. Reputable web design agencies can create a polished and user-friendly site that makes a positive impression on visitors.
- User Experience (UX) Optimization: Web design agencies prioritize creating websites that offer a seamless and intuitive user experience. This can lead to increased user engagement, longer time spent on the site, and higher conversion rates.
- Search Engine Optimization (SEO): Experienced web design agencies incorporate basic SEO practices into their design and development process, helping your website rank higher on search engines and attract organic traffic.
- Support and Maintenance: Web design agencies often provide ongoing support and maintenance services, ensuring that your website remains updated, secure, and functioning smoothly.
- Focus on Core Business: By outsourcing your web design to an agency, you can focus more on your core business activities and leave the technical aspects to the experts.
Ultimately, hiring a web design agency can lead to a well-designed, functional, and effective website that helps you achieve your online goals, whether it’s attracting customers, increasing conversions, or enhancing your brand’s online presence.
How do I choose a web design agency?
Choosing the right web design agency is a critical decision that can have a significant impact on the success of your online presence. Here’s a step-by-step guide to help you choose the best web design agency for your needs:
- Define Your Goals and Needs: Before you start searching, clarify your goals, objectives, and the scope of your project. Determine what you want to achieve with your website and what features and functionalities you require.
- Research and Gather Recommendations: Start by researching web design agencies online. Look for agencies that have experience in your industry or with projects similar to yours. Ask for recommendations from colleagues, friends, or business partners who have had positive experiences.
- Review Portfolios and Case Studies: Check the agency’s past performance and/or case studies to see examples of their past work. This will give you an idea of their design style, creativity, and ability to meet your marketing goals.
- Read Client Testimonials and Reviews: Look for testimonials or reviews from previous clients. This can provide insights into the agency’s professionalism, communication, and overall client satisfaction.
- Assess Expertise and Services: Ensure that the agency offers the services you need, such as design, development, SEO, and more.
- Communication and Collaboration: Effective communication is essential. During your initial interactions, assess how responsive and open the agency is to your ideas and questions.
- Request Proposals and Quotes: Contact the agencies you’re interested in and request detailed proposals or quotes. This should include information about the project scope, timeline, deliverables, costs, and any additional services.
- Consider Budget and Value: While budget is important, also consider the value you’ll receive. A slightly higher investment in a reputable agency might provide better long-term results than going for the cheapest option.
- Understand the Process: Ask about the agency’s design and development process. A transparent and well-defined process demonstrates professionalism and helps manage expectations.
- Meet or Interview: If possible, schedule a meeting or interview with the agency. This allows you to gauge their communication skills, expertise, and how well you can work together.
- Evaluate Support and Maintenance: Inquire about post-launch support and ongoing maintenance. A reliable agency should provide support for technical issues and updates.
- Trust Your Instincts: Ultimately, trust your instincts. Choose a web design agency that you feel comfortable with and confident in their abilities to deliver what you need.
Choosing a web design agency is an important decision, so take your time to research, compare options, and select an agency that aligns with your goals and values.
What is included in web design?
Web design encompasses a range of elements that work together to create the visual and functional aspects of a website. Here’s what’s typically included in the process of web design:
- Visual Design: This involves creating the visual elements of the website, including layout, color scheme, typography, graphics, images, icons, and overall aesthetic appeal. Visual design ensures that the website reflects the brand’s identity and communicates its message effectively.
- User Interface (UI) Design: UI design focuses on creating an intuitive and user-friendly interface for visitors to interact with. It involves designing buttons, menus, forms, and other interactive elements that guide users through the website’s content and features.
- Wireframing and Prototyping: Before diving into the detailed design, web designers often create wireframes and prototypes to outline the website’s layout and functionality. Wireframes are basic sketches that depict the page’s structure, while prototypes provide interactive mockups to test user interactions.
- Responsive Design: Web designers ensure that the website is responsive, meaning it adapts and displays correctly on various devices and screen sizes, including desktops, laptops, tablets, and smartphones.
- Page Layout and Structure: Designers organize the content into a coherent and visually pleasing structure, ensuring that key information is easily accessible and that the overall flow of the site makes sense to users.
- Navigation Design: Designers create the navigation system that allows users to move between pages and sections of the website easily. Intuitive navigation enhances user experience and helps visitors find what they’re looking for.
- Image Editing and Optimization: Images are a significant part of web design. Designers edit and optimize images to ensure they load quickly without compromising quality, which is crucial for a smooth user experience.
- Visual Consistency and Branding: Web designers ensure that there’s a consistent visual theme throughout the website that aligns with the brand’s identity, colors, and style.
- Interactive Elements: Designers incorporate interactive elements such as sliders, animations, hover effects, and transitions that engage users and enhance the overall experience.
- Call to Actions (CTAs): Web designers strategically place and style CTAs to guide users toward specific actions, such as signing up, making a purchase, or contacting the company.
- Accessibility: Ensuring that the website is accessible to users with disabilities is an important aspect of web design. Web designers consider factors like contrast, alt text for images, and keyboard navigation.
- Cross-Browser Compatibility: Web designers test the website across different web browsers to ensure consistent functionality and appearance.
- Feedback and Collaboration: Designers work closely with clients, receiving feedback and making necessary revisions to ensure the final design aligns with the client’s vision.
In summary, web design encompasses everything related to the visual and interactive aspects of a website, ensuring that it’s visually appealing, user-friendly, and aligns with the brand’s identity and goals.
Will you sign a non-disclosure agreement (NDA) to maintain privacy?
What is the typical timeframe for designing a website?
Unfortunately, we can’t give you a straightforward answer here because the estimated time frame depends on your specific project. If we’re building the website from scratch, expect at least 2-3 months of intense work.
What is your process for website design and development?
Every project will have its own unique milestones. However, you can generally expect the following project phases for the standard WordPress website development project:
- Research & Strategy: In our research phase, we delve into your business details, your current website and your competitors’ strengths and weaknesses. Through dynamic meetings and collaborative stakeholder interviews, we identify project goals, measurable KPIs, and platform roadmaps.
- Design: In this phase, we take a holistic approach to your users needs through website roadmaps, wireframes, and high-fidelity prototypes.
- Development: We develop your website with all the agreed upon features and integrations.
- Usability Testing & QA: We use focus groups and internal testing tools to infinity any and all issues that arise. We clean up all potential issues before website launch.
Launch & Growth: We use pre-launch and post-launch checklists to ensure a smooth go-live experience. After your website is launched, we provide training sessions to get your team up-to-speed on the backend. Finally, we offer customized website maintenance and SEO plans to help ensure the longevity of your website.